Sunday, September 26, 2010

App Engine with SiteMesh

SiteMesh is an open source framework based on Java, J2EE, and XML.

SiteMesh acts as a Servler Filter.It allows requests to be handled by the Servlet engine as normal, but the resulting HTML (referred to as the content) will be intercepted before being returned to the browser. The intercepted content has certain properties extracted (typically the contents of the <title >, < head > and < body > tags and is then passed on to a second request that should return the common look and feel for the site (referred to as the decorator). The decorator contains placeholders for where the properties extracted from the content should be inserted.

This tutorial will give you a simple example of how SiteMesh can be used to give you a cleaner layout architecture and configured in the App Engine .

You need SiteMesh version 2.4.2 or greater. Earlier versions do not support AppEngine.

Download from here Add sitemesh-2.4.2.jar to your WEB-INF/lib directory.

Then add the SiteMesh filter to your web.xml as shown below
 <filter>  
   <filter-name>sitemesh<filter-name>  
   <filter-class>  
     com.opensymphony.module.sitemesh.filter.PageFilter  
   </filter-class>  
 <filter>  
 <filter-mapping>  
   <filter-name>sitemesh<filter-name>  
   <url-pattern>/*</url-pattern>  
 <filter-mapping>  


This will call the SiteMesh filter whenever a page on your site is accessed. Now we’ll need to create a /WAR/WEB-INF/decorators.xml file:

 <?xml version="1.0" encoding="UTF-8"?>  
 <decorators defaultdir="/">  
   <decorator name="main" page="main.jsp">  
     <pattern>/*</pattern>  
   </decorator>  
 </decorators>  

This will decorate all of the pages located under /WAR with the decorator /WEB-INF/main.jsp, which we’ll create next:
 <%@ taglib prefix="decorator" uri="http://www.opensymphony.com/sitemesh/decorator" %>  
 <head>  
  <title>  
   HandsOnTutorials.com - <decorator:title default="SiteMesh Tutorial Example" />  
  </title>  
  <style type="text/css">@import "css/global.css";</style>  
  <decorator:head />  
  <body>  
   <div id="header">  
    <h2><a href="http://www.HandsOnTutorials.com/">HandsOnTutorials.com</a> Tutorials</h2>  
   </div>  
   <div id="content">  
    <decorator:body />  
   </div>  
  </body>  
 </html>  

This decorator does a couple of things. First off, it create an HTML title tag, which starts as “HandsOnTutorials.com – ” and then appends the title of the page that is being decorated. If that page does not have a title tag, then a default is used to render “HandsOnTutorials.com – SiteMesh Tutorial Example”. It then adds a global style sheet to every page being decorated and appends whatever is in that page’s head tag, which is useful for page-specific JavaScript, etc. The decorator continues by adding a header to each page reading “HandsOnTutorials.com Tutorials” followed by the decorated page’s content.

If you want decorators to be applied to static content (e.g. to .html files), the following needs to be added to WEB-INF/appengine-web.xml:

 <static-files>  
  <exclude path="**"/>  
 </static-files>  

This forces the static resources to be served by the Servlet engine, rather than a separate static web-server. Without this, the files served by the static web server will not be decorated.

Tuesday, June 30, 2009

Using Spring 2.0 MVC in Google App Engine

In this post we will deploy sample spring 2.0 mvc application on google app engine we will download the spring related jar files from URL http://www.springsource.org/download.

Add the spring related jar files to the project by right click on projects node in the project explorer, choosing Build Path->Configure Build Path (see the image below).

Then select the Library tab and click add jars and select all the jars related to spring as shown below .

We will develop an example where we read from the datastore using spring JDO ,We will use earlier post model class i.e Brand for this example .

We will have an Manager class to obtain the list of Brands and Controller class to list method for the manager . The Manager class is as shown below .

import java.util.List;
import javax.jdo.PersistenceManager;
import org.springframework.orm.jdo.support.JdoDaoSupport;
public class BrandManager extends JdoDaoSupport {
  public List getBrandList() {
    PersistenceManager pm = getPersistenceManager();
    String query = "select from " + Brand.class.getName() ;
    List brandList = (List) pm.newQuery(query).execute();
    return brandList;
  }
}

Controller class is as follows

package com.tutorials;
import org.springframework.web.servlet.ModelAndView;
import org.springframework.web.servlet.mvc.Controller;
import javax.servlet.http.HttpServletRequest;
import javax.servlet.http.HttpServletResponse;

public class BrandController implements Controller{
 private BrandManager brandManager;

 public BrandManager getBrandManager() {
  return brandManager;
 }

 public void setBrandManager(BrandManager brandManager) {
  this.brandManager = brandManager;
 }

 public ModelAndView handleRequest(HttpServletRequest arg0,
   HttpServletResponse arg1) throws Exception {
   ModelAndView modelAndView = new ModelAndView("brandList");
  modelAndView.addObject("brandList", this.brandManager.getBrandList());
   return modelAndView;
 }

}

In Spring MVC DispatcherServlet is the first place a request meets the application, Front Controller pattern uses a HandlerMapping implementation to figure out which Controller class should process the request .

Configure DispatcherServlet in web.xml as shown below


  dispatcher     
  org.springframework.web.servlet.DispatcherServlet     
  1
  
      
  dispatcher     
  *.do
  

Default, DispatcherServlet looks for a configuration file named [servlet-name]-servlet.xml in the WEB-INF directory of your web application

The servlet name in our application is dispatcher so we will create dispatcher-servlet.xml file in /WEB-INF/ folder

In dispatcher-servlet.xml we need configure JDO for appengine using Spring ORM as shown below

 <bean id="pmf"
        class="org.springframework.orm.jdo.LocalPersistenceManagerFactoryBean">
    <property name="jdoProperties">
      <props>
        <prop key="javax.jdo.PersistenceManagerFactoryClass">
          org.datanucleus.store.appengine.jdo.DatastoreJDOPersistenceManagerFactory
        </prop>
        <prop key="javax.jdo.option.ConnectionURL">
          appengine
        </prop>
        <prop key="javax.jdo.option.NontransactionalRead">
          true
        </prop>
        <prop key="javax.jdo.option.NontransactionalWrite">
          true
        </prop>
        <prop key="javax.jdo.option.RetainValues">
          true
        </prop>
        <prop key="datanucleus.appengine.autoCreateDatastoreTxns">
          true
        </prop>
      </props>
    </property>

  </bean>

Code Can be downloaded from this Link

Thursday, June 25, 2009

Using Java Data Storage in Google App Engine

The App Engine datastore stores and performs queries over data objects, known as entities.

Entity is an basic unit of storage ,It consists of four main components

  1. Kind--(Table)
  2. Key--(Primary Key)
  3. Entity group--(Partition)
  4. 0..N typed properties--(columns)

An sample data is as shown below

KindBrand
Key/Brand:Toyota
Entity Group/Brand:Toyota
Rankint64:1
Countrystring:Japan

The Datastore is

  • Transactional
  • Natively Partitioned
  • Hierarchial
  • Schema less
  • Based on Big Table
  • Not a relational database
  • Not a SQL engine

JDO or JPA is transparent persistent frameworks which java app engine supports.

To use JDO to access the datastore, an App Engine app needs the following:

  1. The JDO and DataNucleus App Engine plugin JARs must be in the app's war/WEB-INF/lib/ directory.
  2. A configuration file named jdoconfig.xml must be in the app's war/WEB-INF/classes/META-INF/ directory, with configuration that tells JDO to use the App Engine datastore.
  3. The project's build process must perform a post-compilation "enhancement" step on the compiled data classes to associate them with the JDO implementation.

All the above 3 steps are taken care when we use google plugin for eclipse .

Lets develop an sample application to add ,modify ,delete from datastorage using JDO.

Create an java persistance class for above "brand" example as shown below

package com.tutorials;
import javax.jdo.annotations.IdGeneratorStrategy;
import javax.jdo.annotations.IdentityType;
import javax.jdo.annotations.PersistenceCapable;
import javax.jdo.annotations.Persistent;
import javax.jdo.annotations.PrimaryKey;

@PersistenceCapable(identityType = IdentityType.APPLICATION)
public class Brand {
 @PrimaryKey
 @Persistent(valueStrategy = IdGeneratorStrategy.IDENTITY)
 private Long id;
 @Persistent
 private String name;
 @Persistent
 private String country;
 @Persistent
 private int rank;
 public String getCountry() {
  return country;
 }
 public void setCountry(String country) {
  this.country = country;
 }
 public Long getId() {
  return id;
 }
 public void setId(Long id) {
  this.id = id;
 }
 public String getName() {
  return name;
 }
 public void setName(String name) {
  this.name = name;
 }
 public void setRank(int rank) {
  this.rank = rank;
 }
 public int getRank() {
  return rank;
 }
}
Its just POJO class with couple of annotations

@PersistenceCapable annotation is used to declare java class capable of being stored and retrieved from the datastore with JDO.

@Persistent annotation is used to declare a field as persistance.

@PrimaryKey annotation is used to specify column as primary key .

@Persistent(valueStrategy = IdGeneratorStrategy.IDENTITY)is specified to automatically generate the id for long primary key.

An app interacts with JDO using an instance of the PersistenceManager class. You get this instance by instantiating and calling a method on an instance of the PersistenceManagerFactory class as shown below

import javax.jdo.JDOHelper;
import javax.jdo.PersistenceManagerFactory;

public final class PMF {
    private static final PersistenceManagerFactory pmfInstance =
        JDOHelper.getPersistenceManagerFactory("transactions-optional");
    private PMF() {}
    public static PersistenceManagerFactory get() {
        return pmfInstance;
    }
}
The main servlet code as show below .
package com.tutorials;

import java.io.IOException;
import java.util.List;
import javax.jdo.PersistenceManager;
import javax.servlet.http.*;
import javax.servlet.*;
import com.tutorials.PMF;
import com.tutorials.Brand;
import com.google.appengine.api.datastore.Key;
import com.google.appengine.api.datastore.KeyFactory;

@SuppressWarnings("serial")
public class DataStorage extends HttpServlet  {
 public void doGet(HttpServletRequest req, HttpServletResponse resp)
 throws ServletException ,IOException {
// create the persistence manager instance
PersistenceManager pm = PMF.get().getPersistenceManager();
if(req.getParameter("action").equals("brandCreate")) {
    resp.sendRedirect("/brandCreate.jsp");
}else
if(req.getParameter("action").equalsIgnoreCase("brandCreateDo"))
{
 Brand br = new Brand();
 br.setCountry(req.getParameter("country"));
 br.setName(req.getParameter("name"));
 br.setRank(new Integer(req.getParameter("rank")).intValue());
 // persist the entity
    try {
        pm.makePersistent(br);
    } finally {
        pm.close();
    }
    resp.sendRedirect("datastorage?action=brandList");
}else if (req.getParameter("action").equalsIgnoreCase("brandDisplay")){
 Key k = KeyFactory.createKey(Brand.class.getSimpleName(), new Integer(req.getParameter("brandId")).intValue());
 Brand brandDetails = pm.getObjectById(Brand.class, k);
 req.setAttribute("brandDetails", brandDetails);
 RequestDispatcher dispatcher = getServletContext().getRequestDispatcher("/brandDisplay.jsp");
 dispatcher.forward(req, resp);

}else if (req.getParameter("action").equalsIgnoreCase("brandList")){
 String query = "select from " + Brand.class.getName() ;
 List brandList = (List) pm.newQuery(query).execute();
 req.setAttribute("brandList", brandList);
 RequestDispatcher dispatcher = getServletContext().getRequestDispatcher("/brandList.jsp");
 dispatcher.forward(req, resp);

}else if (req.getParameter("action").equalsIgnoreCase("brandDelete")){
 Brand brandDetails = pm.getObjectById(Brand.class, new Integer(req.getParameter("brandId")).intValue());

  try {
         pm.deletePersistent(brandDetails);
   } finally {
         pm.close();
  }
    resp.sendRedirect("datastorage?action=brandList");
}
 }
}

You can download the whole source code at this url http://www.mediafire.com/?sharekey=0ce17dac893e449b7f7ec40ada4772a620fefd7da6dfe170c95965eaa7bc68bc

Thursday, June 18, 2009

Using Logging in Google App Engine

Logging is pretty easy in the Java Google App Engine it uses java.util.logging.Logger class to write messages to the log. You can control the behavior of this class using a logging.properties file, and a system property set in the app's appengine-web.xml file

Using eclipse IDE it will create the file logging.properties in WEB-INF folder and set system property in appengine-web.xml while creating the web project


    ...


The default log level is WARNING, which suppresses INFO messages from the output. To change the log level for all classes in the HelloWorldApp package, edit the logging.properties file and add an entry for HelloWorldApp.level, as follows:


level = WARNING
com.tutorials.HelloWorldAppServlet.level=INFO

The logs that have been generated by your application are viewable under that application in the Administration Console

Lets add couple of logging statements in our HelloWorldApp as shown below

package com.tutorials;
import java.io.IOException;
import javax.servlet.http.*;
import java.util.logging.Logger;

@SuppressWarnings("serial")
public class HelloWorldAppServlet extends HttpServlet {
 private static final Logger log = Logger.getLogger(HelloWorldAppServlet.class.getName());

 public void doGet(HttpServletRequest req, HttpServletResponse resp) throws IOException {
  log.info("The log for the info");
  log.warning("The log for the warning");
  log.severe("The log for severe");
  resp.setContentType("text/plain");
  resp.getWriter().println("Hello, world");   
 }
}

When we run the application in eclipse ,we will see the logs in console as shown below
Jun 18, 2009 12:07:45 PM com.tutorials.HelloWorldAppServlet doGet
INFO: The log for the info
Jun 18, 2009 12:07:45 PM com.tutorials.HelloWorldAppServlet doGet
WARNING: The log for the warning
Jun 18, 2009 12:07:45 PM com.tutorials.HelloWorldAppServlet doGet
SEVERE: The log for severe

After deploying the project in the appengine ,Access the application once so the logs are generated

In order to see all of the logs generated by our application, sign in to your Administration Console at http://appengine.google.com/admin. In the left hand navigation column, click on the 'Logs', As shown below

Using JSTL in Google App Engine

The JSP Standard Tag Library (JSTL) is a collection of custom tag libraries that implement general-purpose functionality common to Web applications, including iteration and conditionalization, data management formatting, manipulation of XML.

To Use JSTL in the Google App Engine ,No need to download seperately the jstl jar ,App Engine package a version by default .

We need to add sELIgnored="false" to the page directive at the top of the JSP for EL to work. Its an limitation in App Engine .

In earlier post we discussed about Using JSP in Appengine ,We will include jstl related code in index.jsp wehere we are displaying the hello world .

The code snippet which i added to the jsp as shown below

<%@ taglib prefix="c" uri="http://java.sun.com/jsp/jstl/core" %>
<%@page isELIgnored="false" %> 


Sunday, June 14, 2009

Using JSPs in Google App Engine

In the earlier post we output the HTML for our user interface directly from Javaservlet code .

For this tutorial we will use JSPs to implement the user interface . JSPs are part of the servlet standard. App Engine compiles JSP files in the application's WAR automatically, and maps them to URL paths.

We will enhance the hello world application to use the JSP to output the HTML .

Add new jsp file i.e index.jsp under war folder as shown below .

Add new java class HelloWorldAppServletUsingJSP under com.tutorials by right click on com.tutorials new-->class .directory structure is as shown below The code for the servlet is

package com.tutorials;
import java.io.IOException;
import javax.servlet.*;
import javax.servlet.http.*;

public class HelloWorldAppServletUsingJSP extends HttpServlet{
 public void doGet(HttpServletRequest req, HttpServletResponse resp) throws IOException {
  req.setAttribute("hellostring", "Hello From the JSP");
  RequestDispatcher dispatcher = getServletContext().getRequestDispatcher("/index.jsp");
  try {
   dispatcher.forward(req, resp);
  } catch (ServletException e) {
  // TODO Auto-generated catch block
   e.printStackTrace();
  }
 }

}

The simple code for the JSP is


<%@ page language="java" contentType="text/html; charset=ISO-8859-1"
    pageEncoding="ISO-8859-1"%>

<%= request.getAttribute("hellostring")%>

Modify the web.xml appropriately as shown below


  HelloWorldApp
  com.tutorials.HelloWorldAppServlet
 
 
  HelloWorldAppUsingJSP
  com.tutorials.HelloWorldAppServletUsingJSP
 
 
  HelloWorldApp
  /helloworldapp
 
 
  HelloWorldAppUsingJSP
  /helloworldappusingjsp
 
 
  index.html
 

and add entry in the index.html and run the server .

restart the server and access the application as shown below

Click on the HelloWorldAppUsingJSP link as shown below

Saturday, June 13, 2009

App Engine Java HelloWorld tutorial

In this post we will jump right into appengine coding with the ubiquitous “Hello World” example .

For the development we will be using eclipse IDE and google provides appengine plugin for eclipse .

The first step is to add the Google App Engine plugin in eclipse using Help menu > Software Updates… > Add site>.

The site url is:

http://dl.google.com/eclipse/plugin/3.4
Restart eclipse after adding the plugin.

You will see three new icons related to appengine created in eclipse toolbar as shown below

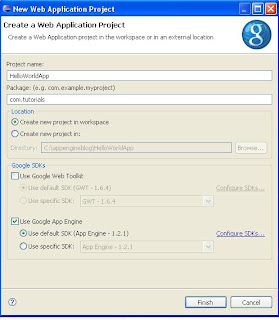
Create a new Web Application Project using File > New > Web Application Project as shown below

Enter the project and package name and uncheck the GWT option as shown below

Then click the finish button and it will create working web application with required libraries as show below

Run the server by selecting the project and from menu Run --Run As -Web Application as shown below

This launches your web application locally on port 8080. You can access your application by typing the URL: http://localhost:8080/ as shown below

If the 8080 port is used by another application in your system then you can change the port through run --run configurations .

Once you're done with your application and you already got the Google confirmation message, you can now create an application.

Log into google appengine through URL http://appengine.google.com/ and click the create an application button ,Type in a unique Application Identifier and the Application Title. This will be used in deploying your application as shown below

Once everything is done, you can now deploy by clicking the Deploy App Engine Project icon as shown below

Configure your eclipse application to use this application id which is "gaetutorials" in this tutorial as project > Google > App engine settings as shown below

Right click on your project > Google > Deploy to app engine.You will be prompted for your user name and password. This is your google account information as shown below .

After deploying the application ,The link to access the application is http://.appspot.com i.e http://gaetutorials.appspot.com/ for this tutorial and it will list all the available servlets as shown below

When you click the Hello WorldApp Servlet it will display finally “Hello, world”.